Once upon a time I taught 2nd grade in a public school–before the age of Pinterest. In fact, we barely used email. I certainly never looked for teaching ideas on the internet–I barely even knew what the internet was...So what the heck did teachers do back in 1999?! Well, we coveted our beautiful, black file cabinets! And the more files stuffed inside–the better! Those file cabinets contained GOLD! Fast forward–now I homeschool (Now in my 19th year)! And my files are just as precious to me as when I taught in the classroom, but instead of being stored in a big, black file cabinet–they are tucked away on the computer. Which hasn’t always looked so pretty! For years I downloaded homeschool files and freebies, just randomly saving them to my desktop! Eventually, I made a Homeschool folder–which ended up a massive mess of folders and documents! Finally–I took the time to organize my digital homeschool files, and it’s made all the difference! Let’s dig in and explore 4 easy steps for organizing your digital homeschool files!
Step 1: Create a Homeschool Folder
On your computer’s desktop, start by creating a Homeschool Folder.
All the homeschool goodies will go here! But we’re not just going to stuff the Homeschool Folder with every freebie and digital product you own! The next step is key to your digital organization…
Step 2: Create Category Folders Within the Homeschool Folder
This is where the magic happens, Sweet Friend!
With the Homeschool Folder, I create specific category folders. Here are my current categories:
- 1st Grade
- Alphabet
- Bible/Character
- Holidays **Special files from Celebrate It! Grab Bag!**
- Elementary Math
- English
- Fine Arts
- Fitness
- High School
- History
- Language Arts Elementary
- Life Skills
- Literature Studies
- Planning & Organization
- Preschool
- Science
- Social/ Emotional Growth
- Unit Studies
**And I have folders for my individual children, where I typically file their writing assignments.
Step 3: Create Subfolders as You Collect Digital Files
Within the category folders, I create subfolders.
For example after I downloaded a spelling game, I created a new folder (Spelling) and added it into my Language Arts Elementary folder.
I even like to create specific folders within the subfolders. In this case, the spelling file I saved was a game–so I created a Spelling Game folder inside of the Spelling folder.
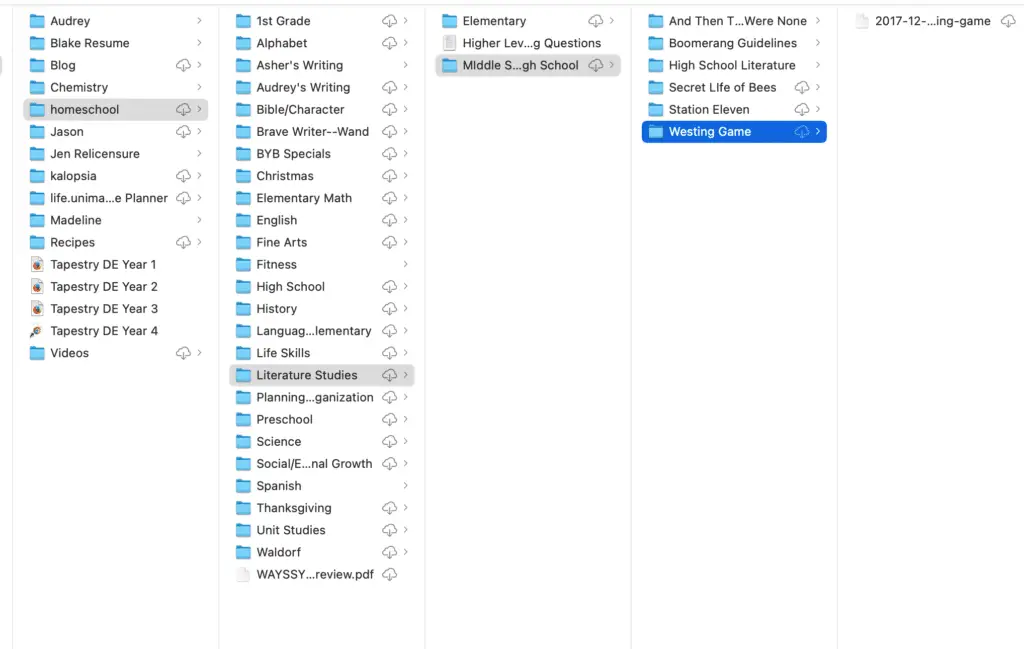
Here’s a screenshot to show you the subfolders within my Literature Studies folder (The highlighted grey areas show the flow of the folders: Desktop–homeschool–Literature Studies–Middle School & High School–Westing Game–Westing Game File)
Step 4: Don’t Be Afraid to Create New Folders!
As you begin to collect more homeschool resources, don’t be afraid to add new folders! You may need to create a new category or subfolder–that is okay! This will help you easily find what you need, when you need it! I try to create new folders when I’m saving any new downloads (otherwise I’ll totally forget and never get it done)!
Digital Files Are a Homeschooler’s Best Friend!
Once you’ve created an organized system on your desktop for storing digital homeschool files–you’ll be able to take full advantage of all the benefits!
Personally I love how cost-effective and family friendly my digital files are (I think they’re especially beneficial when you have multiple children–just print and reprint to your heart’s content)!
And I love that I’m creating a bank of resources for our homeschool journey! We may not be studying anatomy today–but I know I’ve got great digital resources saved right on my computer, ready when the time comes! If my kids get a hankering to learn about bugs over the summer–I can go right to my Science folder and start looking through my resources! Collecting quality, cost-effective resources–and being able to store them efficiently is HUGE for me!
With Love,
Jen xo