Starting out your new blog can be daunting on many fronts. So many things to learn as you put your toe into the water and test out this blogging passion you’ve long been putting off. Now you’re all in, and it’s time to put your hard-earned dollars behind this new project. But how much money should you commit to this new blog and where should you target those dollars? What’s the best return on investment for your limited initial budget? I’ll share with you why Facebook ads were a great source of driving traffic for our blog in the first few months.
The Situation
My wife and I’s blog launched in early September 2017. As of the writing of this post we only have 3 months of data behind us. So let this guide be a perspective from the beginning blogger with a small dedicated budget. If this is your current situation or maybe you’ve been blogging for a while but want to better understand Facebook ads then this is the post for you!
As a new blogger, we wanted what everyone wants out of the gates…people reading our blog! If only the phrase, “If you build it, they will come” was true.
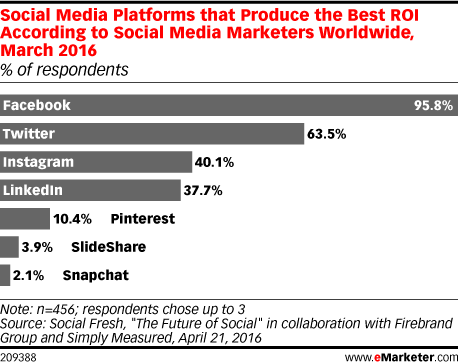
A great option for new bloggers to get traffic is to promote your website and posts. Social media presents the simplest approach to accomplishing this objective. Pinterest, Facebook, and Instagram were the places we turned first. Based on some initial research, Facebook appeared to offer the lowest cost option based on our goals of driving traffic to our new website. eMarketer.com surveyed 456 social media marketers and asked them to choose their top 3 social media platforms based on ROI. Facebook was selected by an astounding 95.8% of those surveyed. Enough said–the experts spoke, we listened.
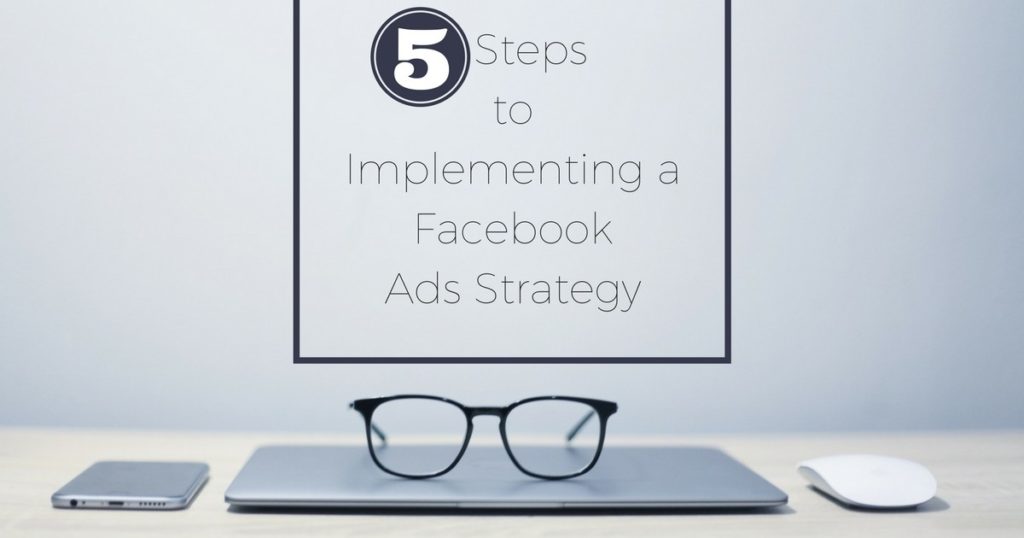
 5 Steps to Building Your Facebook Ads
 5 Steps to Building Your Facebook Ads
First things first, go to the Facebook Business page. Select “Create an Ad” at the top right of the screen (blue button). If your already logged into your Facebook account you’ll be taken to the start page where you can begin building your Facebook Ad campaign.
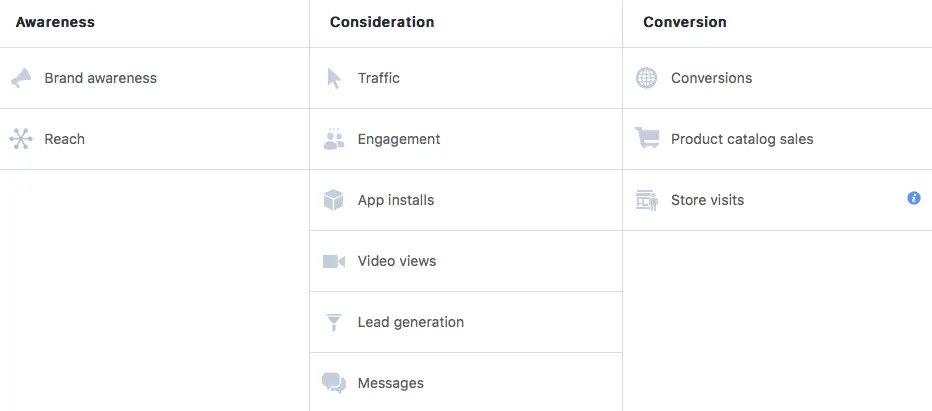
1. Determine Your Business Objective
Our objective was simple. Drive traffic to our new blog. You can do this in one of two ways. Either promote the home page url or choose one of your posts to drive traffic through. If traffic isn’t your goal, Facebook provides opportunities to set many different objectives for your ad campaign. Maybe you simply want engagement with your target audience or video views. You can emphasize brand awareness or reach. Make the decision that best supports your business goals.
After choosing your objective it’s time to name your campaign. Choose a name that describes your campaign in a few simple words. I often name my campaign based on the objective (traffic) and the targeted material I’ll be using for the campaign (our blog post). Why is the name important? Once you have 10 or more campaigns in the hopper it can become difficult to recall what each ad is about if the default name for all your ads is similar. Trust me…distinct ad names will be a huge time saver when you want to conduct analytics on your ads in the future to fine tune your targeting efforts.
2. Choose Your Audience
Marketing 101…know your target audience. Who are you speaking to and who cares about what you have to say? You know your audience better than anyone. Here’s your chance to fine tune the placement of your Facebook ads and speak directly to your people. Why waste your advertising dollars by allowing ads to be placed in front of the wrong people? Great news friends, Facebook lets you start from the 230,000,000 people already on Facebook and whittle it down from there to reach your ideal target audience.
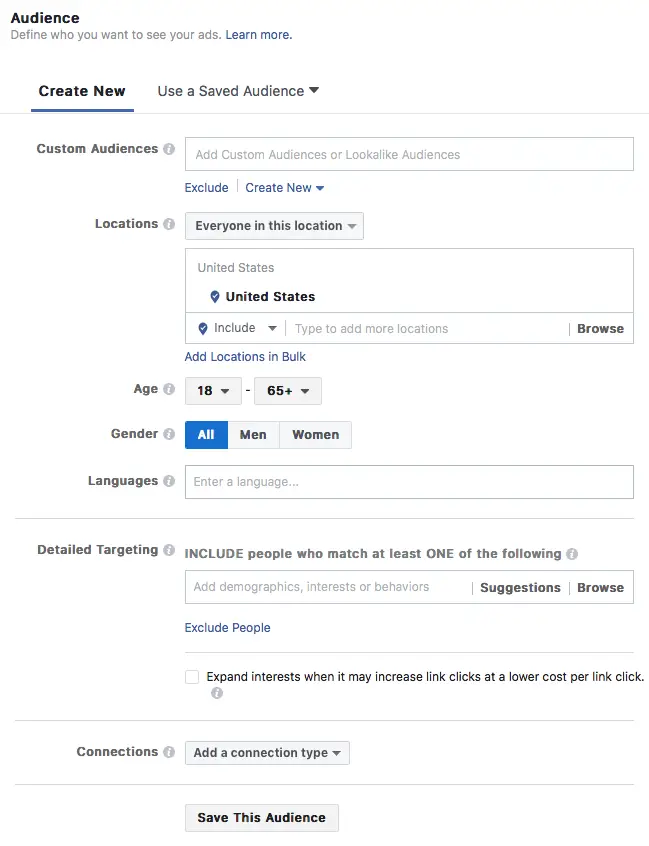
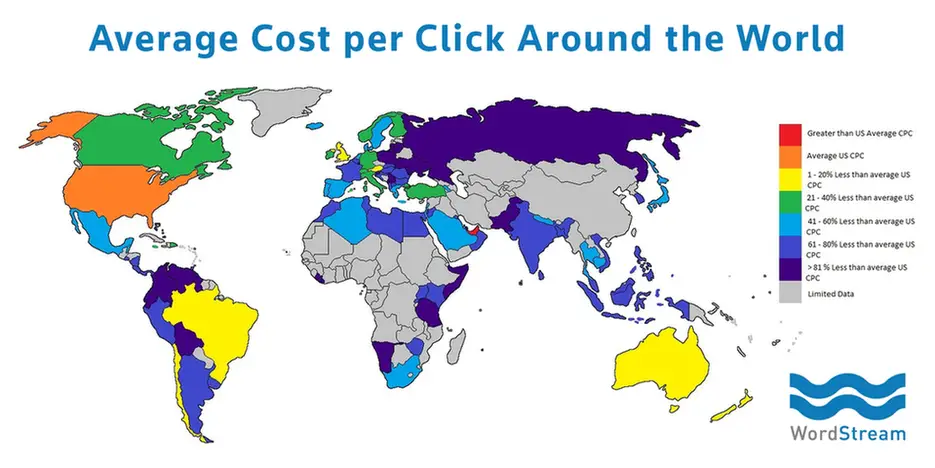
Start by focusing on the geographic locations you want to target. Google Adwords charges a higher premium for traffic coming from the United States. The United States cost per click (CPC) is only higher in ONE other country (United Arab Emirates). Conversely, this means if you want to make money with Google Adsense (I do!), you need to target the highest CPC countries in your audience demographic. According to WordStream, an online advertising company, other top 10 countries with high CPC’s are Australia, Brazil, United Kingdom, and Canada to name a few. Of course, this only makes sense if your target audience resides in these countries. You can’t get clicks in a high CPC country if you don’t have your people there! Click on the map below to see the top 97 countries ranked by CPC around the world.
Consider your target audience age for a moment. Initially, we targeted all Facebook users over the age of 18. After running our Facebook ads for a week, the analytics data told me something interesting. Over half our website clicks were coming from the 18-25 age demographic! The problem–this wasn’t part of our target audience. Yikes! We spent a lot of money on an ad that went to the wrong people. My point…don’t overlook the age demographic when building your ad.
Another nice tool in Facebook Ads Manager is the “Detailed Targeting” feature. Start typing in demographics, interests, and behaviors of your target audience in this box. When you select one of these “Detailed Targeting” characteristics try selecting the “Suggestions” box right next to the search bar. A high number of suggestions based on the characteristic you just entered will be provided in a drop down list. I-LOVE-THIS-FEATURE! Makes my targeting job that much easier.
Once you have some detailed targeting characteristics entered to isolate your target audience, you’re given a new option right under this box. You can now narrow down this initial group even more! This is where it gets fun…and complicated. If your new to Facebook Ads Manager I’d skip this next layer of narrowing down for another day.
The good news, I talk more about some strategies I’ve used to isolate a target audience using this feature. Check out my post, 6 Amazingly Effective Facebook Ad Targeting Tips. You can literally use free data available inside Facebook Ads Manager to get laser focused on your people!
Finally, the last option you see for targeting your ideal audience is the “Connections” button. You can use this area to select people who are connected to your Facebook page, apps, or events.
3. Set Your Budget and Schedule
I’m a firm believer that you’ve got to spend money to make money early on with your blog. I know…this is the pain point in starting a new blog. How much do you want to spend on advertising while diverting indispensable resources away from other parts of your new blogging business? We are only 3 months in at this point. Getting our name out there and familiarizing our target audience with our content is important.
When a new post hits for us, we normally like to set our “Daily Budget” at $3 for the first week to get this post in front of our target audience. Alternatively, you can change the parameter from “Daily Budget” to “Lifetime” budget. This will protect your ad budget from ever going over a certain amount. Next, I monitor our CPC closely during this time, and I also evaluate the audience demographics we are reaching. You seriously can make critical adjustments on the fly with Facebook Ads Manager to either save yourself from paying too much or redirecting your ad to the right people. You can do this even after the ad has gone live! Making adjustments in real-time is really slick. Hey, sometimes we miss, and in spite of your best targeting efforts some adjustments need to be made to your ad.
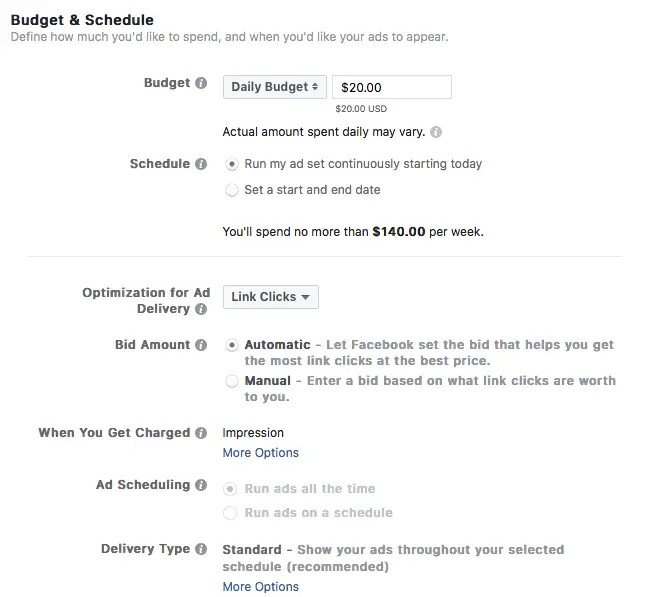
Other factors to consider with your budget is the scheduled times the ad will run. You can run ads all the time or on a schedule. For simplicity’s sake, our ads run all day. I rarely see an issue in the middle of the night where we paid a high percentage of our budget. In fact, if you’re targeting locations outside of the United States, it might be advantageous to run your ads all day. This will allow you to get traffic with your target audience in the United Kingdom while you sleep. Give yourself something nice to wake up to!
The bottom portion of the budget section includes some other options to consider. One of those is the “Optimization for Ad Delivery”. If you want link clicks to your website, I’d leave this section as “Link Clicks”. Facebook will then optimize your ad to drive clicks to your website. Next, I always leave the “Bid Amount” as automatic. I trust what I’ve seen so far from Facebook that this feature does truly optimize for the best price and the most clicks. I’ve seen the manual feature cause my link clicks to be low. I’ll let the Facebook algorithm do the work for me.
Last point on budgets. You have two options for “When You Get Charged”. You can change this selection from the default choice of “Impression” to “Link Click”. I’ve had mixed experiences with this feature. I tend to leave this on “Impression” now. I’ve noticed that when I switch to “Link Click” most CPC can shoot up pretty high. Sometimes even double! The way I look at it, if your content is put in front of the right faces, the link click will happen. If you only want to be charged when the link click happens, I feel like the algorithm gets so laser focused that the reach for your post goes down and you end up paying a pretty high CPC (from my experience). Trust your content to deliver!
Hit the continue button on the bottom of the page and let’s move on to the next step.
4. Load Up Your Content
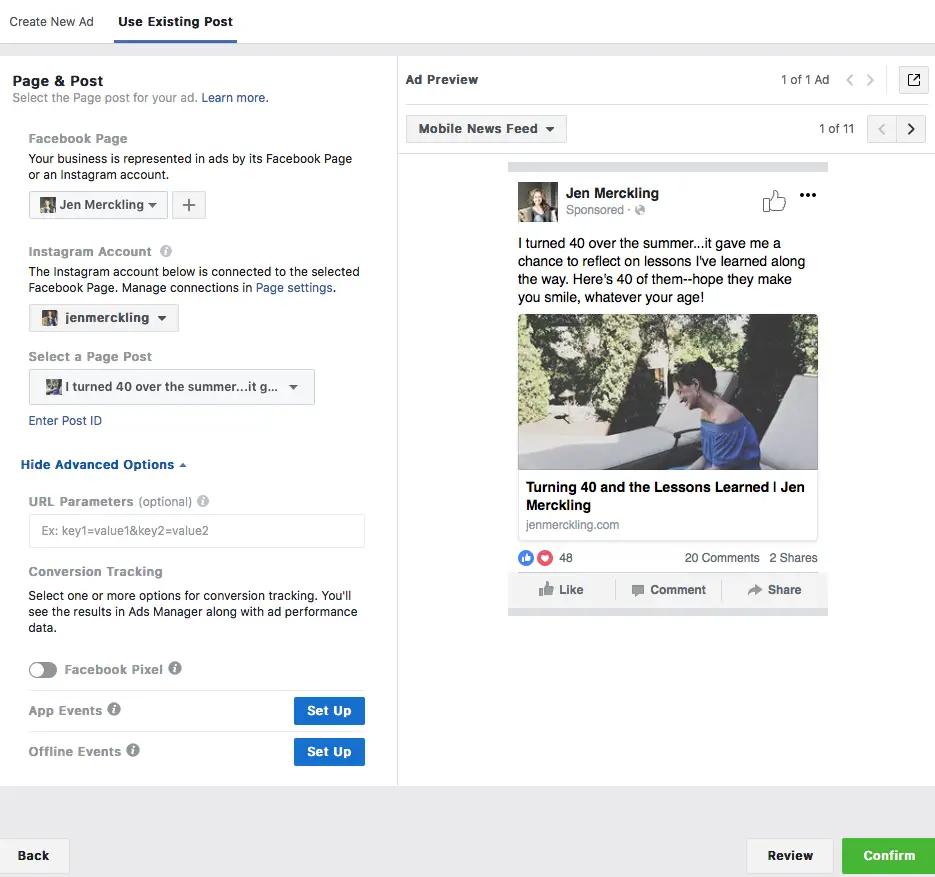
Now the fun part–time to load your content into Facebook Ads Manager! In order to keep this post short, I’m only going to focus on one of the two options available here. On this page you can either “Create New Ad” or “Use Existing Post”. I’m going to show you the “Use Existing Post” option. One caveat, in order for this option to work, you had to already publish your post to Facebook. If not, your post won’t populate in the section entitled “Select a Page Post”.
Let’s walk through this page. In the first section, you should see your Facebook Page and Instagram accounts load automatically. Next, you select your post from the drop down menu. Easy so far, right?
I don’t mess with the advanced options you see at the bottom of this section. There’s a reason they give the option to hide those features. Us newbies don’t need all the bells and whistles right out of the gate. I’m considering ways to implement Facebook Pixel in the future to evaluate conversion strategies and gain a better understanding of my audience that visits our website. I’ll worry about that when our traffic starts to take off! Right now we are a 15,000 pageview/month site in only our 3rd month. We’ve got bigger fish to fry!
5. Review Your Ads
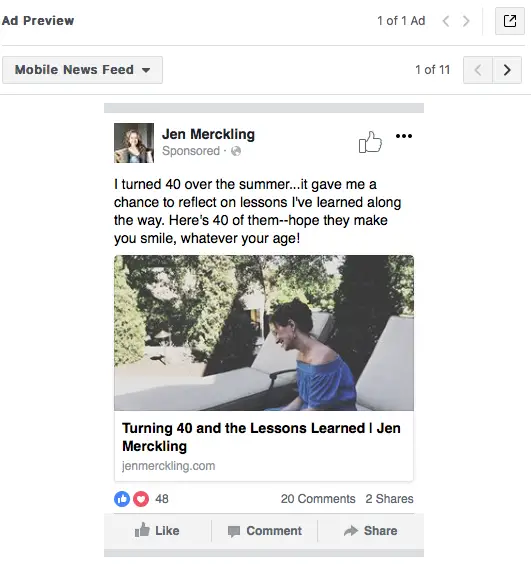
A Facebook Ads Manager feature I really like is the “Ad Preview” section. On the right side of your screen you can see how your ad will look on 12 different feeds or devices. Do some quality assurance in this section and make sure everything looks right.
Congratulations, you’re done! The only step left is to hit the confirm button and…you’re finished!
My hope is that you take a serious look at how Facebook Ads Manager can supplement your promotional efforts. As a new blogging team with my wife (she’s the literary brains behind the operation), I can tell you that Facebook has been the most cost-effective option for promoting our blog and driving website traffic in our first 3 months. I’ve learned some more tips and tricks that I’ll share with you in future posts that I absolutely know will impact your audience targeting and cost effectiveness of Facebook Ads in a BIG way! Stay tuned!
Jason
[convertkit form=5114778]